Tips
for improving your handwriting
You’ve
decided you want to
improve your handwriting and you’re probably hoping a fountain pen will do the
trick -- maybe a friend told you it would. Maybe you’re just adventurous and you
want to try your hand at calligraphy (or you might, once your handwriting
improves). Good for you!
A
fountain pen may make your writing look a bit better, but if your writing looks
as if frenzied chickens got loose on the page, chances are this won’t be
enough. Most likely, you’ll need to retrain your arm and hand.
After
coaching handwriting and teaching calligraphy over the years, I’ve learned to
see the characteristics of those who’ll be able to pick up the necessary
motions quickly from those who’ll have to work a bit harder.

Crampy, uneven
letters are often the result of drawing the letters with the fingers rather
than using the whole arm to write.
People
who inevitably have trouble with handwriting and calligraphy write with their
fingers. They "draw" the letters. A finger-writer puts the full
weight of his/her hand on the paper, his fingers form the letters, and he picks
his hand up repeatedly to move it across the paper as he writes.

If you use the right
muscle groups, your writing will have a smooth, easy flow and not look
tortured.
People
for whom writing comes more easily may rest their hands fairly heavily on the
paper, but their forearms and shoulders move as they write. Their writing has a
cadence that shows they’re using at least some of the right muscle groups. They
don’t draw the letters with their fingers; the fingers serve more as guides.
This
exercise may help you determine which category is yours: Sit down and write a
paragraph. Doesn’t matter what. Pay attention to the muscles you use to form
your letters. Do you draw each letter with your fingers? Pick your hand up
repeatedly to move it? Have an unrecognizable scrawl? Does your forearm move?
Chances are, if you learned to write after 1955-60 (depending on where you went
to grade school), you write with your fingers.
My
goal isn’t to make you into a model Palmer-method writer or a 14th Century
scribe. If you can compromise between the "right" methods and the way
you write now and improve your handwriting so you’re happier with it, then I’m
happy, too.

A few people hold the
pen between first and middle fingers, which feels really awkward to me, but
I’ve seen it work.
It
will take time to re-train muscles and learn new habits. Finger-writing isn’t
fatal, but it is slow and often painful (if you have to write much). The first
thing you must have (beg, buy, borrow or steal it) is patience and gentleness
with yourself. The second requirement is determination.
If
you finger-write, that is the first, most important thing you must
un-learn: Do not draw your letters! Do not write with your fingers! Put
up signs everywhere to remind you. Write it in the butter, on the shaving
mirror, stick notes in the cereal boxes. But learn it!
I
hesitate to include this, because it sounds much more difficult than it is . .
. but . . . let’s look at the most basic things: holding the pen and
positioning the hand.

 Fig. 1. This is the
most common pen-holding position, with pen between first and middle fingers,
held in place by the thumb.
Fig. 1. This is the
most common pen-holding position, with pen between first and middle fingers,
held in place by the thumb.
Most
of us hold the pen between the thumb and index finger, resting the barrel on
the middle finger (fig. 1). This works better than holding it between the thumb
and the index and middle fingers, with the whole assembly resting on the ring
finger (fig. 2). If you do it the first way, you’re off to a good start. If the
second, you’ll be okay. In both, the remaining fingers are curled under the
hand.

Fig. 2. The
two-fingers-on-top method for holding the
pen while writing.
Pick
up your pen and look at your hand. You’ll have better control and a better
writing angle if your pen rests over or just forward of the bottom knuckle on
your index finger, not between thumb and index finger (see fig. 3). (I hold my
fountain pens in the latter position, but when I pick up a calligraphy pen, it drops
obediently right over that big knuckle--go figure!)

Fig. 3. Note that
with this position, usually used for calligraphy (or among really disciplined
writers), causes the pen to rest atop the knuckle of the forefinger.
For
handwriting, the pen position is less important than for calligraphy. I
recommend working in your familiar position unless it’s really bad. What’s
essential is that you be comfortable, the pen feel balanced and you have no
tension in your hand. Rest the heel of your hand and the angle of your
curled-up little finger on the paper.
Hold
the pen lightly; don’t squeeze it. Pretend the barrel is soft rubber and
squeezing will get you a big, fat blot. (If you were using a quill, you’d hold
it so lightly that the actual act of drawing the quill along the paper would
create the proper contact.)
Many
books recommend you write with your table at a 45-degree angle, but that’s
impractical for most of us. If you can prop up a board or write with one on
your lap, that’s a good place to start, but a flat surface is fine. Once you
try an angled surface, you’re likely not to want to quit, so be careful-- here
goes a whole new budget’s worth of art supplies!
Sit
up straight, but not stiffly; don’t sit hunched over or slumped. Don’t worry
too much about this position stuff; the important thing is what makes you feel
relaxed and comfortable. Your writing arm needs to be free to move, so squished
into the La-Z-Boy probably won’t be productive.
Hold
your fingers fairly straight and write slightly above and just between your
thumb and index finger, right where you’re holding the pen. Don’t curl your
hand over and write to the left of your palm; that’s a crampy, miserable
position. More lefties do this than righties.

Commonly called the
"hook" position, this is often seen in left-handers. It makes it
harder, but not impossible, for them to use a fountain pen, because their hands
tend to drag over the wet ink.
When
you’re practicing and you reach the level on the paper at which it becomes
uncomfortable to continue to move your hand down the paper to write, move the
paper up. Once you recognize your "writing level," the paper should
move up at that spot rather than your hand moving down the paper. (This isn’t
critical. If you notice it and it bothers you, that’s what you do about it. If
it doesn’t bother you, skip it.)
I’ve
found only one reference to using the right muscle groups to write, and
this is critical. I can’t be the only person who knows this;
I’m neither that smart nor that good. Calligraphy instruction books address
hand position, desk position, lighting, paper, you name it--but for some
reason, not using the right muscles.
As
you’ve probably surmised, the "right muscles" are not those in the
fingers. You must use the shoulder-girdle and forearm muscles. This muscle
group is capable of much more intricate action than you think and tires much
less easily than fingers, besides giving a smooth, clean, sweeping look to the
finished writing. Though it seems paradoxical, since we’re accustomed to
thinking of small muscles having better control, the shoulder-girdle group,
once trained, does the job better.
To
get a feel for the proper muscles (and start training them correctly), hold
your arm out in front of you, elbow bent, and write in the air. Write big. Use
your arm and shoulder to shape letters; hold your forearm, wrist and fingers
stationary and in writing position. You’ll feel your shoulder, arm, chest and
some back muscles doing most of the work. That’s good. That’s what they’re
supposed to do. Try to duplicate it each time you practice.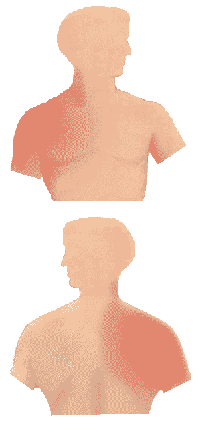
People
always look puzzled when I mention the shoulder girdle. If you raise your hand
in the air and make large circles, note the muscles you use in doing so (here,
shown in darker pink). That’s the shoulder girdle.
Write
in the air until it becomes as natural as breathing. It’ll be awkward and feel
silly at first. If you have a little kid around, get him/her to do it with you.
You’ll both have fun, you won’t feel so alone, and it’ll be good for the
child’s handwriting, too. If you don’t have a kid, tell your co-workers you’re
improving your financial karma or hexing your boss.
As
you become comfortable, reduce the size of the air-letters you make. If you
have access to a chalkboard or a stick and a fence (or even a finger and a
wall), write on them. They’ll give you a feel for the muscles you need to use
and writing on a vertical surface makes it virtually impossible to finger-write.
(If you’re one of the people who can’t write on a blackboard because you keep
wanting to shrink the writing down so your fingers can do it, this is really
important for you.) If you keep wanting to hunch up close and put your hand on
the chalkboard or wall to write, resist the urge! You’ll be indulging those
dratted fingers.
Remember:
Your fingers should move very little and your wrist even less. Your forearm
does most of the guiding, while your shoulder provides the power.
At
some point, you’ll want to try this with a pen. Hold it gently. Place it on the
paper in an ordinary lined spiral notebook (the lines act as ready-made
guidelines for size and spacing). If you can get hold of a first-grader’s Big
Chief tablet, which offers big lines with a dotted line between two bold lines,
use it. There’s a reason children start out writing big and the letters get
smaller as they get older and more skilled—-that’s the
easiest way to learn.Start making Xs and ///s and \\\s and OOOOs and overlapped OOOs and spirals and |||||s.Do not draw these strokes and figures! Use the same shoulder-forearm muscles you’ve been practicing with. Make your lines, loops, circles and spirals freely. Work into a rhythm and make it a habit.

When
you start making slashes and circles, they’ll be uneven. With practice, they’ll
become more uniform, and uniformity is your objective.
Your
goal is smooth, uniform, evenly spaced lines, loops, circles and spirals,
without drawing them.
This
is where you’re most likely to get discouraged. If you use a spiral notebook
for practice, you can leaf back and see your progress. At first, your strokes
and lines will be bad—over-running and under-running the lines, too small, too
big, crooked, uneven, just ugly. Check your position; check your muscle
groups; and try again. And again.
Concentrate
on keeping wrist-hand-fingers largely stationary and in proper alignment. Let
the big muscles do the work. It will be more tiring at first, because you’re
using muscles that aren’t accustomed to that kind of work. It’ll be hard and
frustrating, ’cause your body will want to do it the way it’s done it since
first grade… even though that way is wrong. It may help to concentrate less on
the accuracy of the shapes you’re making than on the muscles making them.
Retraining your arm is the goal, not making pretty little circles and lines
first time out.
Uniformity
and consistency are your aim in all the exercises, whether loopy or slashy.
Though it seems uncomfortable, these exercises will make a huge difference in
your control and smoothness.
When
you start putting the strokes and lines on paper, start out big. Three, four,
even more lines in your notebook. (Big Chiefs are handy for this.) This helps
ensure that you continue to use the shoulder girdle. Don’t try to make pretty
letters at this stage. Do the exercises as much as you can—-shoot for every
day. Ten or fifteen minutes a day should show results in a few weeks for most
people. And note that both air-writing and paper exercises can be doodledduring
meetings and while on holdwaiting for somebody!
Concentrate
on that shoulder girdle. Let it do the work. Write big. Write words and
sentences at the same time you’re doing strokes and exercises. You need both
working together to succeed.
Gradually,
as your control increases, make your strokes and letters smaller until they’re
the size you normally write. You’ll know when you get there. By this time, you
probably won’t have to make extra effort to incorporate this stuff into your
writing; it’ll be automatic. And your writing should look much better (and be
easier and feel better, to boot).
